
If we earn money (or products) from the companies mentioned in this post we will DISCLOSE this clearly - Please see our disclosure policy.
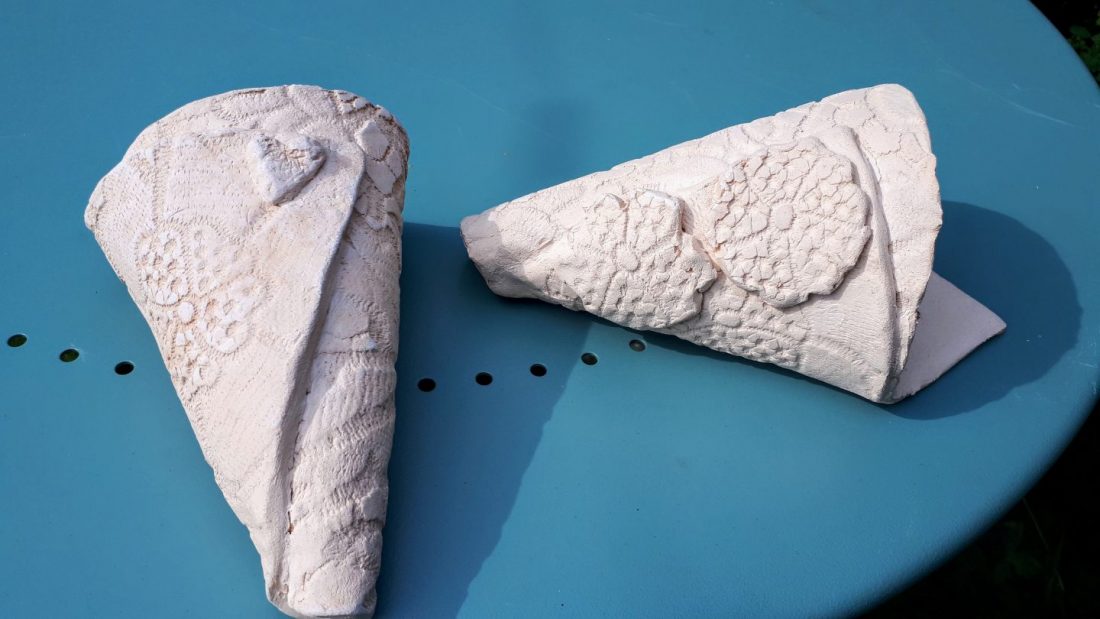
Recently, I made a clay garden planter using hand-building techniques. It was a great Free drop-in session; it took me about an hour to make two small planters. Over the last few years, I’ve made a few clay pieces, have glazed raku pots and glazed jugs and vases. I enjoy creating 🙂
‘Create. Not for the money. Not for the fame. Not for the recognition. But for the pure joy of creating something and sharing it’. – Erne
How it all started
About four years ago, I went to a pottery painting cafe; I painted a vase and jug using glass paint and a clear glaze. They often have flowers from our garden. I had a fab time. It was very relaxing once I decided on my patterns. It was sociable as I went with my cottonopolisWI buddies. I thought I must go back another time and do some more. Then life got in the way.
Then last year, I had a bit more time, I started visiting CreateBolton. I did a couple of courses -glazing raku and make a garden ornament.
Unfortunately, I can’t use a pottery wheel, as the water doesn’t help my arthritis finger pain; and it takes a fair amount of strength to throw the pot.
I’m trying quite a few different ways of making ceramics, so I’ll report back.

Painted vase and jug – I painted at Pottery Corner, Chorlton, Manchester with my lovely Cottonopolis Women’s Institute pals.
Little did I realise painting this jug would lead to… ceramics, and making silver clay jewellery. Making ceramics has also helped me find my creativity in my 40s – I wrote about it earlier in 2019. I’m a great believer in trying a new skill, who knows – you might discover what you love. That’s what happened with silver clay – I’m hooked on it.
- Never too late to be creative – flowers, silver clay jewellery, beads, pottery
- How to make a silver clay pendant using a texture – for Beginners
*****
Time
- about an hour
- I made two planters and My Chap made two as well
What you need to make a clay garden planter
- A melon sized lump of clay (not a water melon size 😉)
- Rolling pin
- Two pieces of wood – about 2cm thick
- Newspaper
- A board
- Template made from paper –
- use this to practise rolling your planter first
- get an idea of what part of the lace pattern will appear on the
- A piece of thick cotton lace (you can find these in charity shops or offcuts in haberdashery stores)
- Some clay slip (i.e. watered down clay) – this is the glue to sick the clay together
- A sharp knife
- Spatula
- Damp cloth
- A knitting needle or other round implement – use this to make the hole to hang the planter
Clay type and size
- The clay I used was stoneware – it is fired once, glazed and then re-fired. I’ll ask about the firing temperatures.
- the planter will be waterproof and cope with the cold. I’ll be bringing the planters inside when it’s frosty though.
- The planter is about 20cm in length and about 9cm wide.
Method – Clay Garden Planter
1. Roll out the clay
- Put newspaper onto your board
- Roll out the clay to an even thickness
- Use a rolling pin to get an even round or oblong shape
- Keep turning the clay so it is an even thickness – use two pieces of wood and run the rolling pin along the top of the wood.
2. Decoration
- lay the lace onto the clay – press into the clay firmly
- if the lace has a distinct pattern – make sure a nice part will show on the front of the (use the paper template to work out where is best).
- peel the lace carefully away from the clay
- Be careful not to stretch the clay – it is very heavy

paper template with clay showing lace decoration
3. Make a cone shape
- Carefully wrap the clay into a cone shape
- Make sure there’s a small drainage hole at the bottom.
- There will be excess clay – so mark small notches to know where to cut off the extra.
- Unroll and cut the excess off including making small decorations for the planter (e.g. hearts)

clay garden planter wrapped to make a cone
4.Sticking overlap together
- Use the knife to make little crisscross slash lines along the underneath of the clay overlap
- Make little slash lines along the other part of the clay
- Use a spatula to put plenty of slip on the slash marks and push the clay carefully together – the slip is the ‘glue’
- Wipe away any extra slip that escapes.
5. Additional decoration
- used metal cutters to add hearts – and pressed onto the edge of the clay overlap.
- Make small slash marks on both planter and the heart – use slip as glue (as above)
6. Tidying the clay
- Wipe all the edges of the clay to make sure there are smooth edges
- Smooth over or press together cracks – as this will help prevent the piece shattering in the kiln
Note:
- any pattern or blemish on the clay will appear exactly the same when the piece is fired so be carefully wipe the edges and smooth blemishes.
- damp clay is heavy and will stretch so handle it carefully
- if you need to re-roll the clay – place the clay in layers – and try not to get any air pockets as this will make the clay explode in the kiln.

three clay garden planters drying on window sill
Next steps – clay garden planter
Dry for at least a week.
As the clay dries, it changes to a white/grey colour. It needs to be totally dry otherwise it will explode in the kiln.
Fire in the kiln and decorate
- This is the first ‘bisque’ firing
- I’ll let you know the temperature and time in the kiln – this depends on the type of clay and whether you need the final pottery piece to be frost safe/use outdoors/waterproof.
Come back next time to see how I glazed the planters – and how they turned out
*****
My teacher – Jackie Noy from Hilton Farm Ceramics
Massive thanks to Jackie for teaching us how to make this planter. My Chap took to it like a duck to water, as usual. It was very relaxing and easy craft to do. Jackie is a fabulous teacher – she also makes wonderful ceramic pieces including pots of all sizes, small houses, wall plates, lighthouses – using many hand-building techniques.
I’ve made two hand-built daisy flowers as garden decorations with Jackie last year – My Chap is making a frame for these at the moment.
We also had fun on a raku course – literally playing with fire 😉
Jackie has a new website in progress and is planning on running more courses – she’s based just outside Bolton, Lancashire.
Follow Jackie on Instagram @hiltonfarmceramics
Create Bolton – pottery studio
I made my garden planter at a ‘drop in’ session at CreateBolton. I’ve been going to CreateBolton fundraising events for about five years; last year
Many thanks to this fabulous charity which uses the creative arts to help people in Bolton from all backgrounds. If you are local, do visit them.
Joy who leads the creative projects is a wonderful lady, a great teacher and helps everyone to find their inner creativity whether it’s through making pottery, painting and other creative activities.
- www.createbolton.com
- Follow them on facebook – CreateBolton
I am very grateful that I met these wonderful people 🙂 they’d helped me be so much more creative… and find more inner peace.
*****

two clay garden planters showing lace decoration
I find making pottery, very restful and relaxing – it helps to be delicate, placing things carefully. Also planning what I will do first, using paper cut-outs, drawing my designs and thinking through all the processes to make something. Concentrating on what I am doing helps keep me be ‘in the moment’.
‘Shape clay into a vessel; It is the space within that makes it useful. Cut doors and windows for a room; It is the holes which make it useful. Therefore, benefit comes from what is there; Usefulness from what is not there’. Laozi
This quote reminds me of mindfulness, being in the present – and helps me focus.
*****
If you’d like to have a go at making pottery or ceramics, have a look for a local pottery studio or ceramic artist – they often run drop-in sessions for a low cost or free.
*****
Have you tried making pottery? Let me know in the comments. If you have made something from clay let me know?
Carpe Diem,
love Bec xx
Follow my adventures:
Sign Up here (via MailChimp) to receive my blog posts and an ‘irregular’ newsletter
Pin this

clay garden planter #clayplanters clay ideas #pottery #handbuilt #lacedecoration #aqua


24 Comments
This fifty something lifelorraine
10/07/2019 at 10:33 pmThese look great Bec, I’m into creating stuff for the garden so I might try something like this using air dried clay.
Bec - views from my garden bench
11/07/2019 at 12:45 pmThanks Lorraine – I’m pleased with it so far – I’m glazing them at the moment – it takes two or three layers depending on the effect.
I’ll ask if it’s possible to do this using air dried clay.
There’s a few pottery places around us – I’ll let you know if I see something out your way.
Love Bec 🙂
Afshan Nasim
11/07/2019 at 1:11 pmThis looks like so much fun and to see the finished pottery is amazing. Well done!
Bec - views from my garden bench
11/07/2019 at 1:18 pmthank you – it’s straight forward to do. I’m going to keep one plain and glaze the others.
Michelle Twin Mum
11/07/2019 at 6:22 pmI love the lace printing onto the clay, so clever, who knew something so delicate could leave such an imprint. Mich x
mumsoffduty
11/07/2019 at 8:36 pmThese look great. What a clever idea to use lace, such a great effect!
Bec - views from my garden bench
11/07/2019 at 8:37 pmthank you – yes it’s amazing isn’t it? needs firm pressing in and no smudging 🙂
Ryan
12/07/2019 at 7:20 amWhat a great little craft! I haven’t done pottery for years (the last thing I made was an African-inspired vase) but I might have to have another go!
Bec - views from my garden bench
12/07/2019 at 9:27 amThanks Ryan – there’s some places in Manchester city centre that do it – it’s v relaxing.
Jon | The Money Shed (@themoneyshed)
12/07/2019 at 11:46 amWow! They look absolutely amazing! Just shows what you can do if you just put a bit of spare time aside for crafts like this!
Sabina (@MummyMatters)
13/07/2019 at 11:16 amYou’ve done a great job with these. They look very pretty indeed. You have great imagination!
Alexandra Cook
13/07/2019 at 12:04 pmOh wow, This is such a cute and fun idea. I love how creative you are doing this. I have to try making this.
Tracey Kifford
13/07/2019 at 11:50 pmThese look really good. I might have a go myself!
jennifuchs
14/07/2019 at 7:54 amWhat a clever idea, I’d never have thought to use lace for this. They look great!
Miranda (Anosa)
14/07/2019 at 8:07 amThis looks like a lot of fun, we have not made planters in forever and this would be a great way to get back into them.
danielle
14/07/2019 at 8:48 amwow this looks so much fun and crafty!!! What a fab idea
Bec - views from my garden bench
18/07/2019 at 4:19 pmThank you 🙂 xx
Alexandra Cook
14/07/2019 at 12:41 pmThis looks really look. This would be really perfect at my garden. Willt try making this.
The Unbalancing Act
14/07/2019 at 5:01 pmI actually saw something similar done with concrete – great ideas either way!
Thoroughly Modern Grandma
14/07/2019 at 7:48 pmThese look lovely. I’m always pottering about in the garden and love finding unusual pots and things to put plants in. I’ll have to try making some.
WhatLauraLoves
14/07/2019 at 10:07 pmThis looks so effective! It doesnt sound like it would be too fiddly to do either, your instructions are really clear xxx
loopyloulaura
14/07/2019 at 10:30 pmThese look like a fantastic addition to a garden and a great homemade gift for a teacher or friend who loves gardening
Laura Schwormstedt
15/07/2019 at 5:10 pmOh wow what a fun and cool garden craft – I love the finished lace effect! Such a good idea
Laura x
Bec - views from my garden bench
15/07/2019 at 5:52 pmThank you – it looks really effective